Embarking on a journey into home improvement can often feel like peering into a vast, intimidating toolkit, leaving many aspiring DIYers overwhelmed before they even begin. The sheer array of specialized equipment, particularly power tools, might suggest that only seasoned professionals can tackle meaningful projects. Yet, the truth is far simpler: with a foundational set of beginner DIY tools, you can confidently transform your living space, install intricate trim, or simply hang cherished wall art, all without the initial investment or intimidation of heavy machinery. The key lies in selecting truly essential home improvement tools that maximize versatility and ease of use.
In the accompanying video, Kristen, a self-taught DIY enthusiast, demystifies the process by sharing her curated list of go-to beginner-friendly tools. She illustrates how a targeted selection of simple implements, along with a few gateway power tools, empowers anyone to achieve professional-looking results. This guide expands on her valuable insights, providing a deeper dive into these indispensable items, complete with additional context, usage tips, and a broader perspective on their transformative potential for your DIY projects. We aim to equip you not just with a list, but with the confidence to wield these tools effectively and safely.
Essential Hand Tools for Precision and Simplicity
Before diving into anything with a motor, mastering the fundamental hand tools is paramount. These manual implements are often underestimated, yet they form the backbone of countless DIY projects, offering control, precision, and an invaluable understanding of the mechanics involved. They are the unsung heroes of many a successful home improvement endeavor, proving that sophisticated results don’t always require complex machinery.
The Mighty Miter Box and Hand Saw
For those apprehensive about wielding a power miter saw, the humble miter box and hand saw combination emerges as a true game-changer. This duo provides an accessible entry point into accurate wood cutting, replacing the more intimidating power saw for many initial projects. While it demands a bit more physical effort, the precision achieved is remarkably consistent, especially for molding and trim work.
This affordable set, often costing around $10, is equipped with pre-set notches that guide your saw blade to exact angles, including 90 degrees for straight cuts, and crucial mitered angles like 22.5 and 45 degrees for seamless corner joints. Imagine installing elegant picture frame molding or upgrading your baseboards; these precise cuts are fundamental to achieving a polished, professional finish. Furthermore, the manual control minimizes the risk of over-cutting or splintering, common concerns for new users. It’s akin to learning to drive a stick shift before an automatic; it builds a deeper understanding of the craft.
Miter Shears: Small Cuts, Big Impact
Complementing the miter box, miter shears are another essential addition to any beginner’s DIY tool kit, particularly for lightweight trim work. These heavy-duty scissors offer an even simpler, quicker method for making small, precise cuts on thinner materials. They eliminate the need for a larger setup, allowing you to snip through trim pieces with remarkable ease, much like a tailor deftly cutting fabric.
Miter shears come with an adjustable angle guide, typically allowing you to set common angles like 45 degrees, perfect for those intricate corners in picture frame molding or cabinet embellishments. While they won’t tackle hefty wood blocks, their efficiency for small decorative trim, PVC, or quarter-round molding is unparalleled. They are ideal for quick touch-ups and detail work, making short work of jobs that might otherwise require pulling out a larger, more cumbersome tool. Think of them as the precision scalpel to the m miter box’s sturdy bone saw.
Achieving Flawless Finishes: Painting and Prep Tools
Painting is one of the most transformative and satisfying DIY projects, capable of dramatically altering the ambiance of a room with relative ease. However, the quality of the finish often hinges on the right preparation and the selection of appropriate tools. These essentials ensure your walls are not only beautifully colored but also boast crisp lines and even coverage, elevating your home improvement results.
Extendable Paint Roller Sticks: Reaching New Heights
For anyone tackling wall painting, especially floor-to-ceiling projects, an extendable paint roller stick is not merely a convenience but an absolute necessity. This simple yet ingenious tool revolutionizes the painting process, allowing you to reach high ceilings and low baseboards without the constant strain of climbing ladders or bending excessively. It’s the ergonomic backbone of efficient painting, saving your back and dramatically speeding up the workflow.
Typically extending from around 2 feet to 4 feet, these rollers ensure uniform coverage across large surfaces, minimizing streaks and lap marks. The consistency of pressure applied through an extendable handle often leads to a smoother, more professional finish than what can be achieved with a short roller from a ladder. Furthermore, various versions are available, some with extra padding for comfort or extended lengths for particularly tall spaces. Selecting the right size for your home is crucial, as it acts as an extension of your arm, providing effortless reach and consistent application, much like a skilled painter’s steady hand.
The Versatile Power of Painter’s Tape
Painter’s tape, though often perceived as a mere painting accessory, is an indispensable asset for nearly every DIY project, extending its utility far beyond creating clean paint lines. It serves as an invaluable planning and visualization aid, a temporary adhesive, and a protector, making it a cornerstone of successful home improvement. Neglecting its potential is akin to building a house without a foundation.
Before any permanent installation, painter’s tape allows you to mock up layouts for wall art, picture frame molding, or shelving, ensuring perfect placement and spacing. Its temporary adhesion means you can adjust and re-adjust without damaging surfaces, effectively preventing costly mistakes. For painting, its ability to create crisp, razor-sharp lines against trim, ceilings, or accent walls is unmatched, acting as a barrier against errant drips and spills. Moreover, it can temporarily hold small components in place while adhesives dry or screws are driven, proving its versatility as a critical planning and execution tool.
Smart Solutions for Hanging and Mounting
Hanging items securely and precisely is a common DIY task that can quickly become frustrating without the right tools. From delicate wall art to heavy mirrors, understanding how to properly mount objects ensures both aesthetic appeal and structural integrity. These innovative solutions simplify the process, empowering beginners to hang items with confidence and accuracy.
Effortless Wall Art: 3M Drywall Picture Hangers
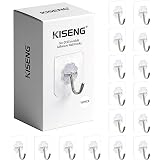
For those seeking the ultimate in simplicity and effectiveness for hanging wall art, 3M drywall picture hangers are a revelation. These claw-style hangers offer a tool-free solution for mounting items, sidestepping the need for drills or even stud finders for many applications. They represent a significant leap in user-friendliness, allowing homeowners to personalize their spaces with unprecedented ease.
The innovative design features small, sharp claws that press directly into drywall, creating a surprisingly strong anchor capable of holding significant weight. With options like 25-pound claws for smaller pieces and robust 65-pound claws suitable for substantial items like full-wall mirrors, they cater to a wide range of hanging needs. Some kits even include integrated markers to assist with precise placement, ensuring your décor is perfectly aligned. This technology operates on a simple principle of distributing weight across multiple contact points within the drywall, providing remarkable holding power without the need to locate a stud—a truly clever engineering solution.
The Indispensable Stud Finder: StudBuddy
While 3M hangers offer incredible convenience, some projects inherently demand the structural support of a wall stud. Mounting a television, installing heavy shelving, or hanging curtains with substantial drapery necessitates locating these hidden wooden supports. The StudBuddy stands out as a remarkably simple yet highly effective solution for this crucial task, sidestepping the complexities of electronic stud finders.
Unlike electronic models that rely on batteries and often emit confusing beeps or lights, the StudBuddy is a purely magnetic stud finder. It effortlessly glides across your wall, latching onto the metal screws or nails embedded in the studs. This magnetic attraction not only pinpoints the stud’s location but also holds itself firmly in place, freeing your hands to mark the spot. Its straightforward operation eliminates guesswork, making it a reliable tool for any project requiring robust anchoring. It’s a beacon of simplicity in a world of increasingly complex gadgets, proving that sometimes, the most basic approach is the most effective.
Demystifying Power Tools: Your First Steps
The leap from hand tools to power tools can feel daunting, but certain entry-level power tools are specifically designed to be beginner-friendly, offering a significant boost in efficiency and capability without the steep learning curve. These tools are the bridge to tackling more ambitious projects, opening up a new realm of possibilities for the enthusiastic DIYer. They are not merely faster versions of their manual counterparts; they empower new methods of construction and finishing.
Your First Power Tool: The Cordless Drill
If there’s one power tool that should grace every beginner’s arsenal, it’s the cordless drill. This versatile workhorse transcends basic driving tasks, enabling a myriad of installation, assembly, and demolition projects. The initial intimidation is understandable, but with a simple practice session, the power and precision of a cordless drill quickly become second nature, much like learning to ride a bicycle for the first time.
Starting with an electric screwdriver can be an excellent stepping stone, offering a feel for powered rotation in a more compact form. However, the cordless drill’s added torque and speed, along with its ability to accept various drill bits, unlock capabilities for drilling pilot holes, driving longer screws, and even mixing paint. Whether you’re hanging curtains, installing blinds, assembling flat-pack furniture, or mounting fixtures, a cordless drill accelerates the process dramatically. Investing in a quality model with adjustable clutch settings allows you to control the torque, preventing stripped screws and damaged materials, thereby ensuring both efficiency and pristine results.
Sanding Made Easy: The Orbital Sander
For any refinishing project that involves sanding, from refreshing old furniture to prepping new trim, an orbital sander is a non-negotiable tool. The sheer physical and time-consuming effort of hand sanding large surfaces can quickly exhaust even the most determined DIYer, turning a weekend project into an endless chore. An orbital sander transforms this laborious process into a swift, satisfying task.
This lightweight, often cordless, power tool operates by rapidly moving its sanding pad in small, random orbits, which minimizes visible swirl marks and produces an incredibly smooth finish. It’s user-friendly, typically requiring only a firm grip and activation, allowing the tool to do the heavy lifting. The sanding sheets attach easily with a hook-and-loop system, making changes quick and effortless. Think of it as having a tireless assistant for surface preparation; it achieves in minutes what would take hours of manual labor, ensuring your refinishing projects are completed with speed and a professional-grade smoothness, even on extensive surfaces like staircase railings or cabinetry.
Seamless Finishes with a Caulking Gun
Often overlooked by beginners, a caulking gun is an indispensable finishing tool that elevates the perceived quality of any home improvement project. It’s the secret weapon for bridging unsightly gaps, sealing against drafts, and creating a truly finished appearance. Without it, even meticulously crafted installations can appear incomplete, much like a beautifully framed painting lacking a proper mat.
This simple mechanical device holds a tube of caulk, sealant, or liquid nails, allowing you to dispense the product with controlled precision. Whether you’re sealing gaps around window and door trim, ensuring watertight seals in a bathroom, filling cracks in baseboards, or bonding materials together with liquid adhesive, the caulking gun provides a smooth, continuous bead. Mastering the technique of applying caulk, then tooling it for a neat finish, is a skill that dramatically improves the aesthetic appeal and energy efficiency of your home. It’s the final flourish that makes a good project look great, ensuring every seam and joint is perfectly integrated.
Mastering Trim Work with a Cordless Brad Nailer
For those ready to delve into more advanced finishing carpentry, such as installing intricate trim, baseboards, door casings, or crown molding, a cordless brad nailer is an unparalleled asset. It bridges the gap between manual nailing and heavy-duty framing, offering precision and power without the need for an air compressor. This tool accelerates finish work dramatically, allowing for rapid, secure installation with minimal fuss, much like a sewing machine for fabric, but for wood.
Though its appearance might initially seem complex, modern cordless brad nailers are designed with user safety and ease in mind. They are lightweight, handheld, and typically include features like sequential firing and depth adjustment, making them highly controllable. After a few practice runs on scrap wood, you’ll quickly appreciate its ability to sink nails flush with the surface, leaving only a tiny hole that’s easy to fill. This tool not only speeds up the installation process but also provides a more robust and professional fastening method than hammer and nails, ensuring your trim work is both beautiful and durable. It allows you to transform an ordinary room into an architectural statement with relative ease.
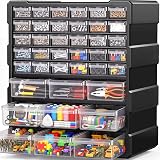
The All-in-One Beginner Tool Kit
While acquiring individual tools as needed is a valid approach, an all-inclusive beginner tool kit often provides an excellent foundation and tremendous value. These pre-assembled kits are specifically curated to furnish you with a broad spectrum of basic hand tools, ensuring you’re prepared for an extensive range of common household tasks and nascent DIY projects. It’s like having a well-stocked pantry; you might not use everything at once, but it’s there when inspiration strikes.
A typical beginner tool kit usually features a hammer for driving and pulling nails, a measuring tape for accurate dimensions, a variety of screwdrivers (Phillips and flathead) for different fasteners, and often includes a wrench for tightening bolts, pliers for gripping, and an Exacto knife for precise cutting. Some comprehensive sets even include a level, ensuring your installations are always plumb and true. These kits eliminate the hassle of individually sourcing each item, ensuring you have the immediate essentials to tackle unexpected repairs or embark on your first small home improvement ventures. Having such a ready-to-go bag simplifies organization and makes the entry into DIY considerably less intimidating, much like having a curated starter library for a budding scholar.
Nailing Down Your Essential DIY Tool Questions
What tools do I need to start with home improvement projects?
To begin, focus on essential hand tools like a miter box and hand saw, miter shears, and versatile items like painter’s tape. A cordless drill is also a great first power tool for beginners.
Do I need to buy expensive power tools right away for DIY?
No, you don’t need expensive power tools immediately. Many beginner projects can be tackled with basic hand tools, and a few entry-level power tools like a cordless drill offer a great start without a steep investment.
What is a good first power tool for a beginner?
The cordless drill is considered the most essential first power tool for beginners. It is highly versatile for tasks like drilling holes, driving screws, and assembling furniture.
How can I hang things on my wall easily without a drill?
For simple wall art, 3M drywall picture hangers are an excellent tool-free option. They use small claws to press into drywall and can hold a surprising amount of weight without needing a drill or stud finder.
Why is painter’s tape useful for DIY projects?
Painter’s tape is not just for painting; it helps create clean paint lines, allows you to plan layouts for wall art, and can temporarily hold small parts in place during assembly.